 Share
Share
Supreme Today AI
Introduction
Welcome to Supreme Today AI, where the power of Artificial Intelligence enhances your Legal Research and Drafting. This user manual will guide you through the process of signing up and logging in to the SupremeToday.ai website and mobile application on both Android and Apple devices.
1. Accessing the Application
Visit www.supremetoday.ai on your web browser
Or, download the mobile app from the Apple App Store or Google Play Store.
2. Sign Up/ Log In
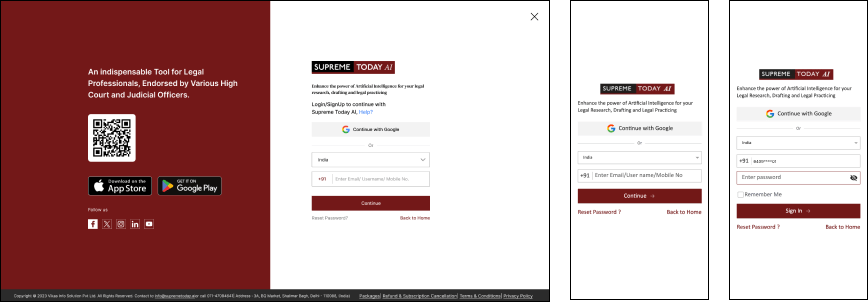
2.1 Creating an Account
Visit the SupremeToday.ai application or website.
Tap on "Sign Up" and fill in your details like name, email, and password.
Review and accept the Terms of Service and Privacy Policy.
Tap "Sign Up" to complete the process.
Congratulations! Your SupremeToday.ai account is now ready.
2.2 Verifying Your Mobile Number
After signing up, check your mobile for a verification OTP from SupremeToday.ai.
Enter OTP to verify your mobile and access your account.
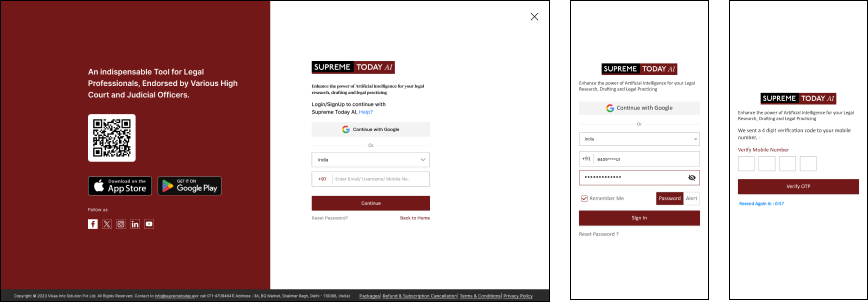
2.3 Logging In
Open the application or visit the website.
Enter your email, phone number, or password to log in.
While logging in from multiple devices, an OTP (One-Time Password) will be sent for additional security.
2.4 Forgot Password:
If you forget your password, tap on "Reset Password" on the login screen.
Enter your email and follow the instructions sent to reset your password.
2.5 Security and Privacy
We take your security seriously. Your personal information is encrypted for protection.
Review our Privacy Policy for more details on data security.
2.6 Troubleshooting
If you encounter any issues, refer to our troubleshooting guide on the website or contact our support team for assistance.
2.7 Support and Contact Information
Email: info@supremetoday.ai
Phone: 011-47094841
Visit our website for FAQs and additional contact options.

Quick Search – How to do
All Search → Example Query → Generate AI → View Results → Open Judgment
Citation Search → Type Citation → Search → Open Judgment
Party Name Search → Type Party Name → Search → Open Judgment
Step-by-Step Guide: Quick Search (All / Citation / Party Name)
Method 1: All Search
Step 1: Open Home Page
Login to Supreme Today AI.
On the home page, open the search bar.
Select All from the search options.
Step 2: Use Example
Click Example.
The system will automatically generate a query.
Click Generate AI.
Step 3: AI Searching
The AI will start searching legal data.
Results will appear with judgment links.
Step 4: Open Judgment
Click the judgment link provided in the results.
The judgment page will open.
Method 2: Citation Search
Step 1: Select Citation
On the home page search bar, click Citation.
Step 2: Enter Citation
Type the citation of the case.
Example: SCC 2020 103
Step 3: Search
Click Search.
The system will show the matching judgment.
Step 4: Open Judgment
Click the citation result.
The judgment with citation details will open.
Method 3: Party Name Search
Step 1: Select Party Name
On the search bar, click Party Name.
Step 2: Enter Party Name
Type the name of the party involved in the case.
Example: State of UP
Step 3: Search
Click Search.
The system will show cases related to that party name.
Step 4: Open Judgment
Click any case title from the results.
The judgment will open.

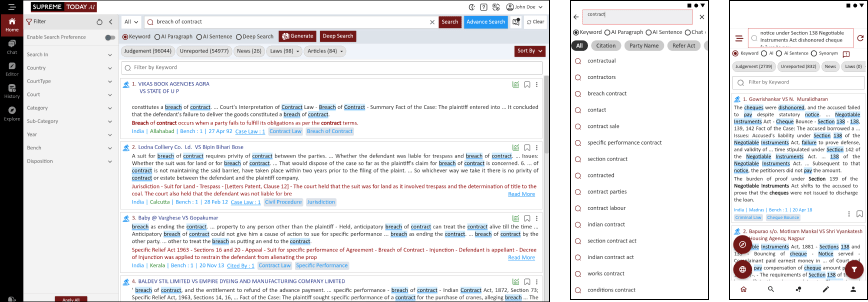
Search Option
SEARCH OPTION : KEYWORD | SYNONYMS | AI PARAGRAPH & PARALLEL PARAGRAPH | AI SENTENCE
Choose Search Type → Keyword / Synonym / AI Sentence / AI Paragraph → Run Search → Open Judgment → Click Paragraph Number → Click Star Icon → AI Assistant Opens → View Related Cases & Links
Step-by-Step Guide: Smart Search
Step 1: Open Search
Open the Search section.
Choose the type of search you want to perform.
Step 2: Keyword Search (Exact Word)
Select Keyword Search.
Enter the exact word or phrase you want to search.
Example:
“bail granted”
“motor accident compensation”
The system will show results containing the exact words used in judgments.
Step 3: Synonym Search (Similar Words)
Select Synonym Search.
Enter the word you want to search.
The system will search similar words and related terms.
Example:
Search word: dismiss
Results may include:
dismiss
reject
refuse
This helps you find cases even if different wording is used.
Step 4: AI Sentence Search
Select AI Sentence Search.
Type a complete sentence describing the legal issue.
Example:
“Can anticipatory bail be granted in a dowry harassment case?”The AI understands the meaning of the sentence and finds relevant judgments.
Step 5: AI Paragraph Search
Select AI Paragraph Search.
Enter a full paragraph describing the legal situation.
Example: A husband is accused in a dowry harassment case and seeks anticipatory bail claiming false implication. What judgments discuss granting anticipatory bail in such cases+
The AI reads the entire paragraph context and returns the most relevant case laws.
Step 6: Open the Judgment
Select any result from the search list.
Click the judgment title to open it.
Step 7: Navigate to Paragraph
Inside the judgment, paragraphs are shown with numbers.
Click the paragraph number to jump directly to that paragraph in the judgment.
Step 8: Use AI Assistant
Next to the paragraph you will see a star icon.
Click the star.
The AI Assistant panel will open.
Step 9: View Related Cases
The AI Assistant will show related case laws connected to that paragraph.
Each result will include a judgment link.
Step 10: Open Related Judgment
Click the judgment link shown in AI Assistant.
The related case will open for further reading.

Advanced Search

See Example → Open Advanced Search → Enter Search Fields → Click Search → Sort Results (Most Cited) → Apply Filters → View Results → Open Judgment
Step-by-Step Guide: Advanced Search
Step 1: See Example
Open the Search page.
Click See Example to view a sample search query.
This helps understand how to structure the search.
Step 2: Open Advanced Search
Click Advanced Search.
The advanced search panel will open with multiple search fields.
Step 3: Enter Search Details
1) Free Text
Enter keywords, legal issues, or phrases related to the case.
Example:
second FIR permissible
adverse possession
murder by knife
2) Act Referred
Search judgments referring to a specific Act.
Example:
Indian Penal Code (IPC)
Code of Criminal Procedure, 1973
3) Section Referred
Filter cases that mention a specific section of law.
Example:
Section 482 CrPC
Section 138 NI Act
Section 306 IPC
4) Citation (Publisher / Year / Volume / Page No.)
Search judgments using a legal citation.
Example:
SCC 2000 Volume 5 Page 123
5) Party Name
Search cases using the name of the petitioner or respondent.
Example:
State of Maharashtra
Ram Singh
6) Judge Name
Find judgments delivered by a specific judge.
Example:
Justice D.Y. Chandrachud
7) Advocate Name
Search cases argued by a specific advocate.
Example:
Kapil Sibal
8) Case Number / Year
Search using the official case number and year.
Example:
Criminal Appeal No. 1234 / 2021
9) Date Range
Filter judgments based on the decision date.
Example:
From Date: 01-01-2020
To Date: 31-12-2023
Step 4: Run Search
Enter the required search fields.
Click Search.
The system will display matching judgments.
Step 5: Sort Results
Use Sort By option.
Select Most Cited to show the most frequently cited judgments first.
Step 6: Apply Filters
You can further refine the results using filters.
Filters available:
Country
Court
Key Phrase
Category
Sub-Category
Year
Year Slider
Bench
Disposition
Step 7: Use Preference Toggle
Turn Preference ON or OFF.
This allows certain filters to be applied or removed.
Step 8: View Results
The filtered search results will appear on the screen.
Each result will display the case title and citation.
Step 9: Open Judgment
Click any case title from the results.
The full judgment page will open for reading.

QUICK SEARCH CITATION - HOW TO DO
Home Page → All Options → Citation → Type Citation → Select Suggestion → Open Judgment
Advanced Search → Enter Citation Details → Search → Open Judgment
Step-by-Step Guide: Search Judgment by Citation
Method 1: Quick Citation Search
Step 1: Open Home Page
Go to the Home page.
Click All Options.
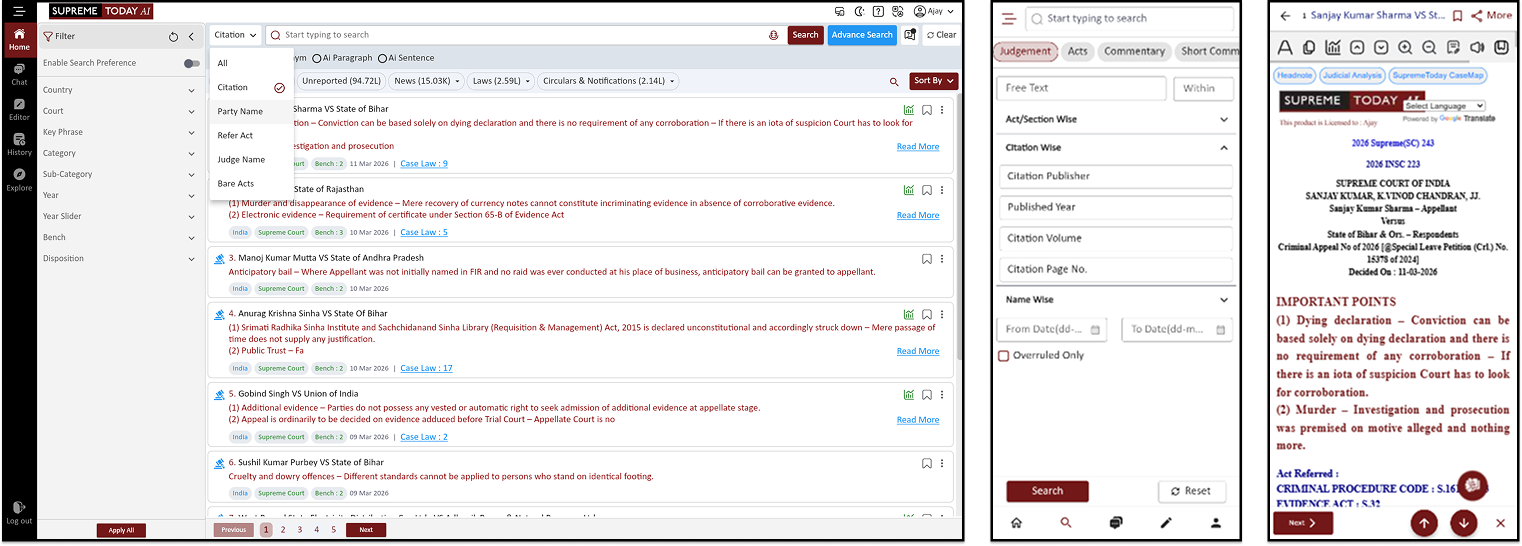
Step 2: View Search Options
You will see several search options such as:
AI
Citation
Party Name
Refer Act
Judge Name
Bare Acts
Step 3: Select Citation
Click Citation.
The citation search field will open.
Step 4: Enter Citation
Type the citation of the case.
Example: SCC 2020 103
As you type, suggestions will appear.
Step 5: Select Suggestion
Click the matching citation suggestion.
The system will open the judgment directly.
Method 2: Advanced Citation Search
Step 1: Open Advanced Search
Go to the Search section.
Click Advanced Search.
Step 2: Enter Citation Details
Enter the citation information in separate fields:
Citation Publisher → SCC
Published Year → 2020
Citation Volume → (enter volume number)
Citation Page No. → 103
Step 3: Run Search
After entering all citation details, click Search.
The system will display the exact judgment result.

CASE BINDER
ORGANIZE YOUR LEGAL RESEARCH WITH CASE BINDER
Search Judgment → Add Bookmark → Open Bookmark History → Create Case Binder → Arrange Cases → Select Page Format → Open in Editor → Download PDF
Step-by-Step Guide: Create Case Binder from Bookmarks
Step 1: Search Judgment
Open the Search section.
Search for the judgment you need.
Open the judgment page.
Step 2: Add Bookmark
Click Add Bookmark.
Enter a Bookmark Name.
Add a Note if required.
Select an already created folder or create a new one.
Click Submit.
The judgment will be saved in your bookmarks.
Step 3: Open Bookmark History
Go to History.
Click Bookmarks.
All your bookmarked cases will appear.
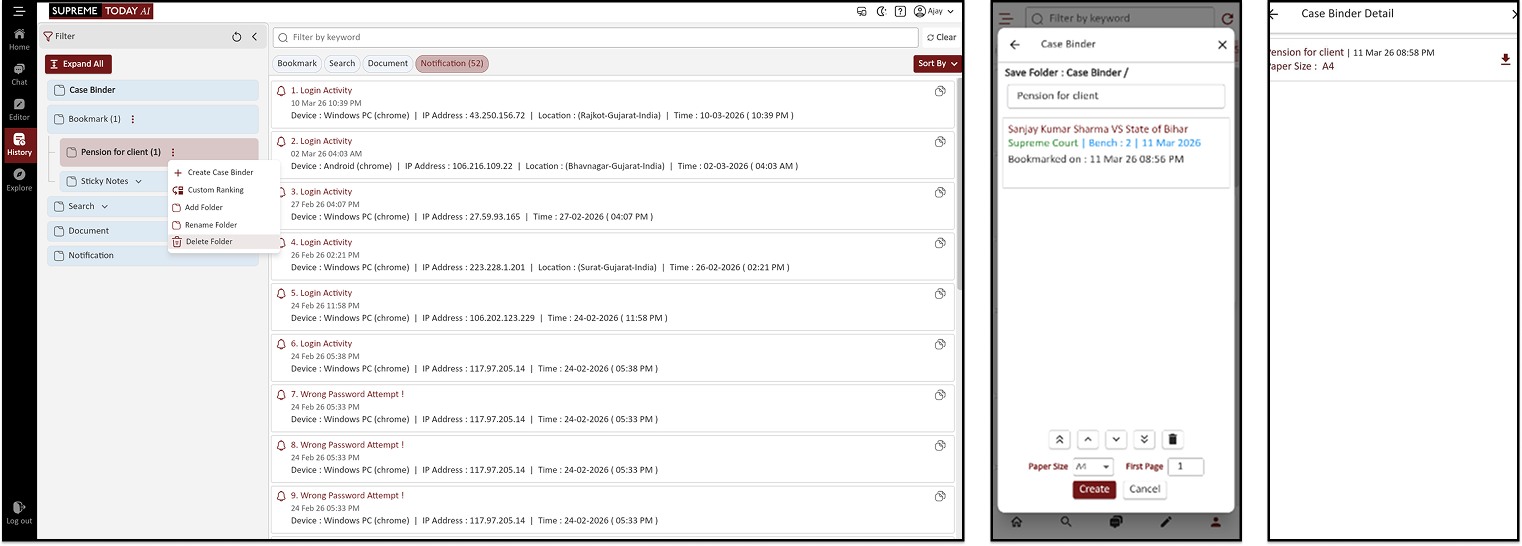
Step 4: Create Case Binder
Click the three dots (⋮) next to bookmarks.
Select Create Case Binder.
Choose the bookmarked cases you want to include.
Step 5: Arrange Cases
You can move cases up or down to change their order.
Arrange the judgments according to your requirement.
Remove any case if it is not needed.
Step 6: Select Page Format
Choose the page format:
A4
Legal
Click Create Binder.
Step 7: Open Case Binder
Click Case Binder.
The binder will open in the Editor.
Step 8: Format the Binder
Inside the editor you can:
Edit text
Arrange content
Format the document
Step 9: Download PDF
After formatting, click Download PDF.
The PDF will include all the judgments added to the binder.
How to Begin - Quick Navigation Bar

1.1 Home/ Dashboard
The Home Dashboard serves as your central hub for navigation. Here's how you can make the most of it:
Quick Search: Quickly find legal content by entering relevant keywords.
Change Language: Adjust the language setting to your preference.
Switch to Dark Mode: Customize the interface with a darker theme for comfortable viewing.
Canvas Mode: Toggle to view content in canvas mode for enhanced readability.
Keywords: Access a list of commonly used legal terms and keywords.
Advanced Search: Utilize advanced search options for detailed inquiries.
Voice Search: Perform searches using voice commands for hands-free operation.
Help: Access assistance and support resources whenever needed.
3.2 Chat
The Chat feature allows for interactive communication. Here's how to use it effectively
Ask a Question: Engage in chat to seek answers to legal queries.
Write a Draft: Create drafts for legal documents within the chat interface.
Upload to Summarize a Case: Upload documents for AI-driven case summarization.
3.3 Editor
The Editor tool empowers you to draft legal documents and make annotations. Here's how to get started:
Upon selecting "Editor," you'll be directed to a text editing interface where you can input and edit legal content as needed.
Quick Search
Quick Search Basics
To begin your search, follow these steps:
Log in to your Supreme Today AI account.
On the platform's main dashboard, locate the "Quick Search" bar, typically located at the top of the page.
Click inside the Quick Search bar to activate it.
Type your search query using keywords, phrases, or Boolean operators.
AI-Powered Legal Search: Smarter, Faster, and More Precise Research
AI Synonyms Search:
Enhances search accuracy by identifying and retrieving legal terms and phrases with similar meanings, ensuring comprehensive results even when different terminology is used.
E.g.: prima facie for breach of intellectual property rights
AI Search (Conceptual Search)
By Paragraph or Summary:
Delve deep, irrespective of length, capturing the essence of legal narratives.
The AI Search for Legal Professional provides in-depth guidance for legal professionals to capture the essence of legal narratives regardless of document length.
Our Legal Research AI Search Engine introduces a powerful feature that allows users to search by any length, be it a single sentence, a paragraph, or an entire document, to discover similar law points discussed anywhere within a judgment or summary. This capability is at the core of this sophisticated tool, enhancing the efficiency and precision of your legal research process. Whether you need to pinpoint specific legal insights or extract key elements from extensive legal narratives, this tool simplifies the task and ensures a seamless research experience.
By Sentence:
Fine-tune your search to pinpoint exact legal sentiments.
Introducing the AI Sentence Search feature in our Legal Research AI Search Engine, which empowers users to search by a single line law point and discover similar law points discussed anywhere within a judgment or important details, streamlining your legal research with precision and efficiency.
3. Settings & History
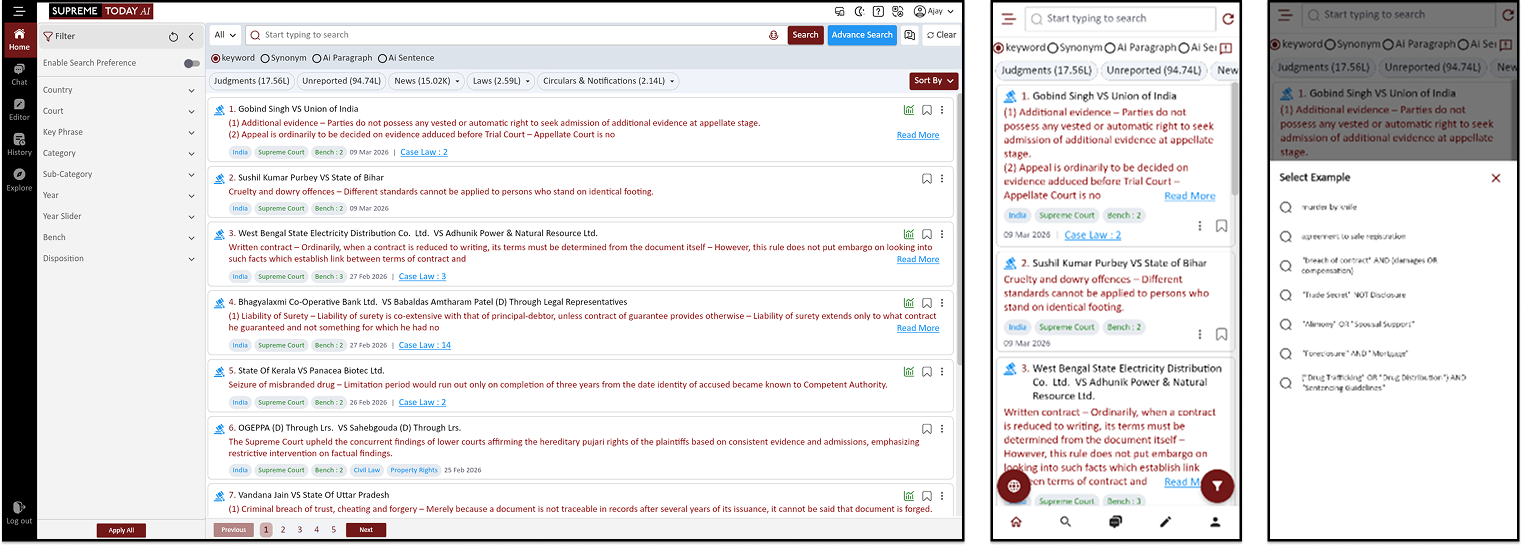
HOME PAGE - INTRODUCTION
Open Home Page → Enter Search Query → Select Search Type (Keyword / Synonym / AI) → Click Search → Filter by Category → Sort Results → Open Judgment → Use Helper Tools → Scroll Document → Use AI Assistant
Step-by-Step Guide: Home Page (Supreme Today AI)
Step 1: Open Home Page
Login to Supreme Today AI.
The Home Page will open.
At the top you will see the Search Bar (Text Field).
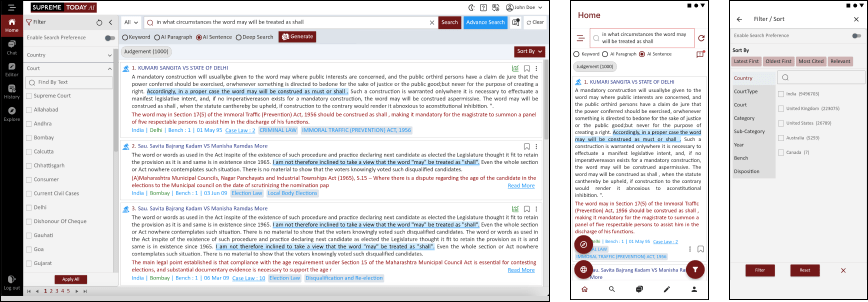
Step 2: Enter Search Query
In the Search Text Field, type your query.
You can search using:
Keyword
Synonym
AI Paragraph
AI Sentence
These options help you search judgments in different ways.
Step 3: Click Search
After typing your query, click the Search button.
The system will show search results.
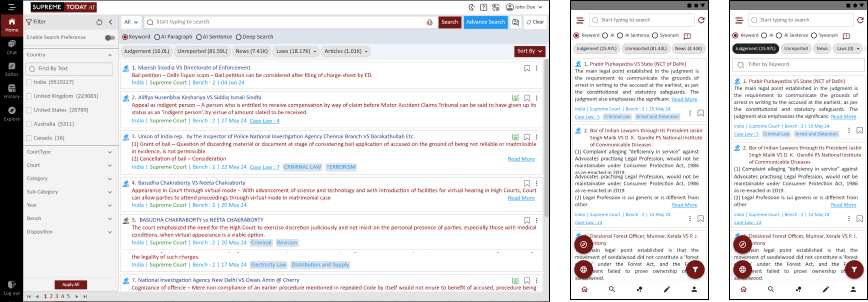
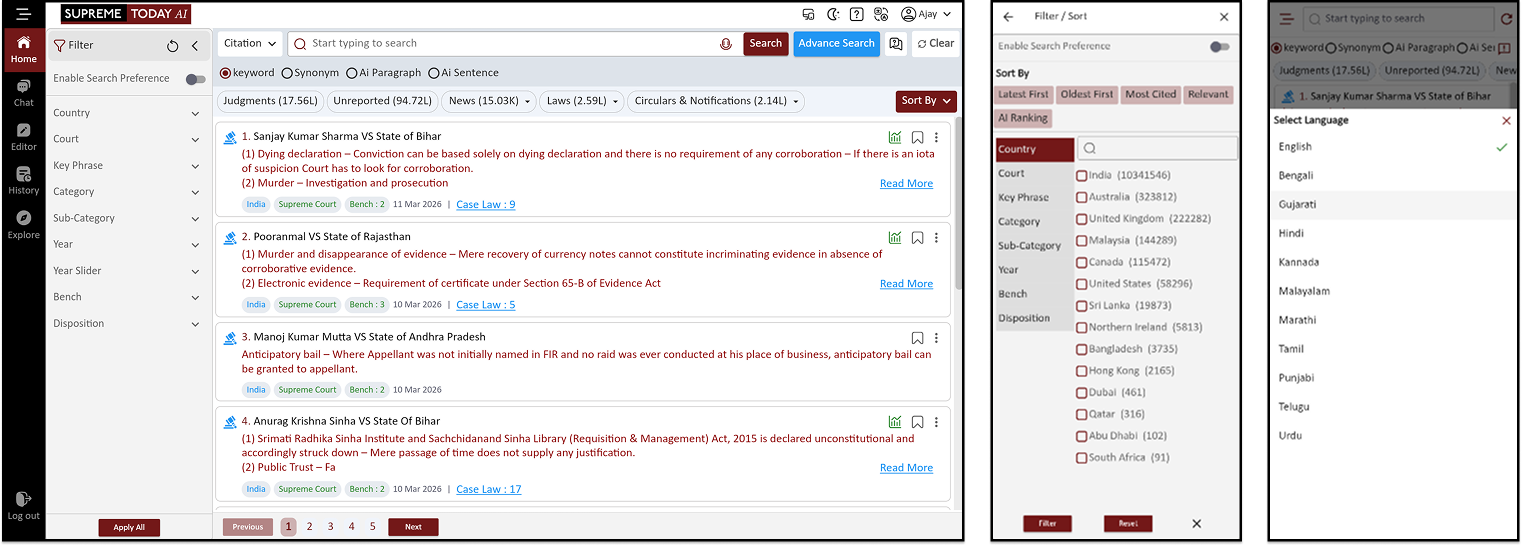
Step 4: Select Content Type
You can filter the results using these categories:
Judgments
Unreported
News
Laws
Circulars & Notifications
Click the required category to view results.
Step 5: Sort Results
Click Sort By.
You can sort results by:
Relevance
Date
Step 6: Open Judgment
From the results list, click any case title.
The full judgment page will open.
Step 7: Use Judgment Helper Tools
On the judgment page you will see several helper tools:
Court Copy – View official court PDF
Headnote – Jump to key legal points
Judicial Analysis – See case analysis
SupremeToday CaseMap – View case relationship map
Step 8: Scroll Through Judgment
Use the scroll bar to move through the judgment.
This allows you to read the entire document.
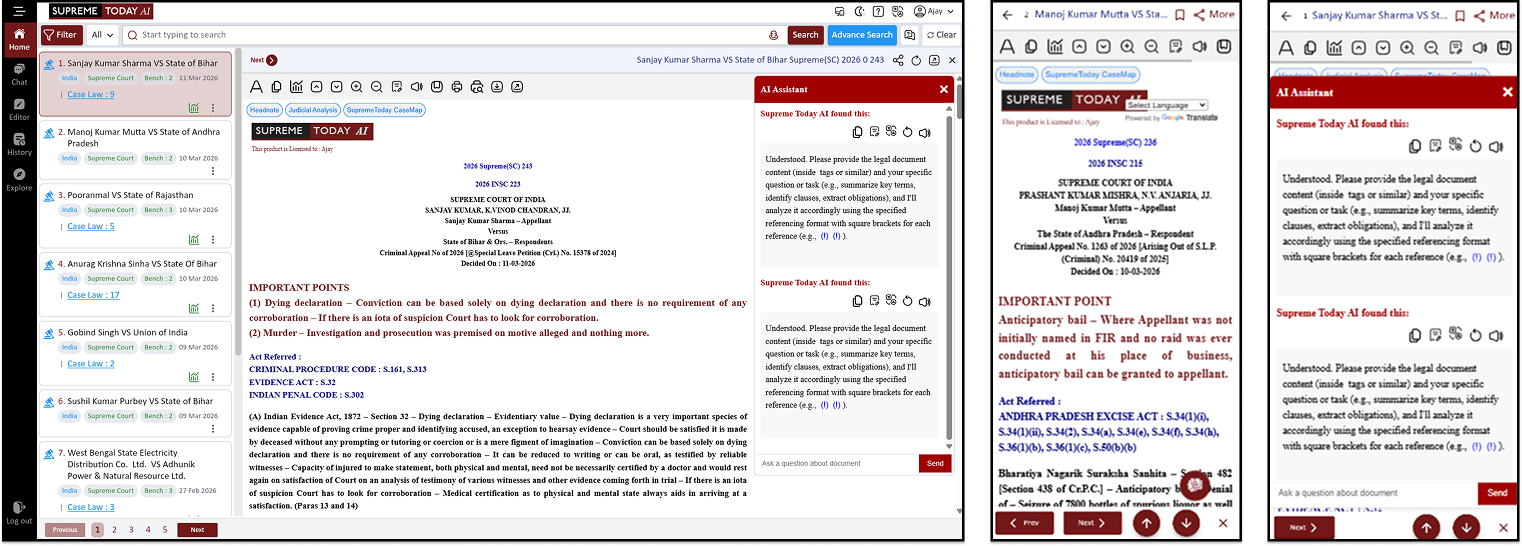
Step 9: Use AI Assistant
Click the AI Assistant icon.
The AI assistant will open.
You can chat with AI about the judgment and ask legal questions.

PREFERENCES - SETTINGS & THEME
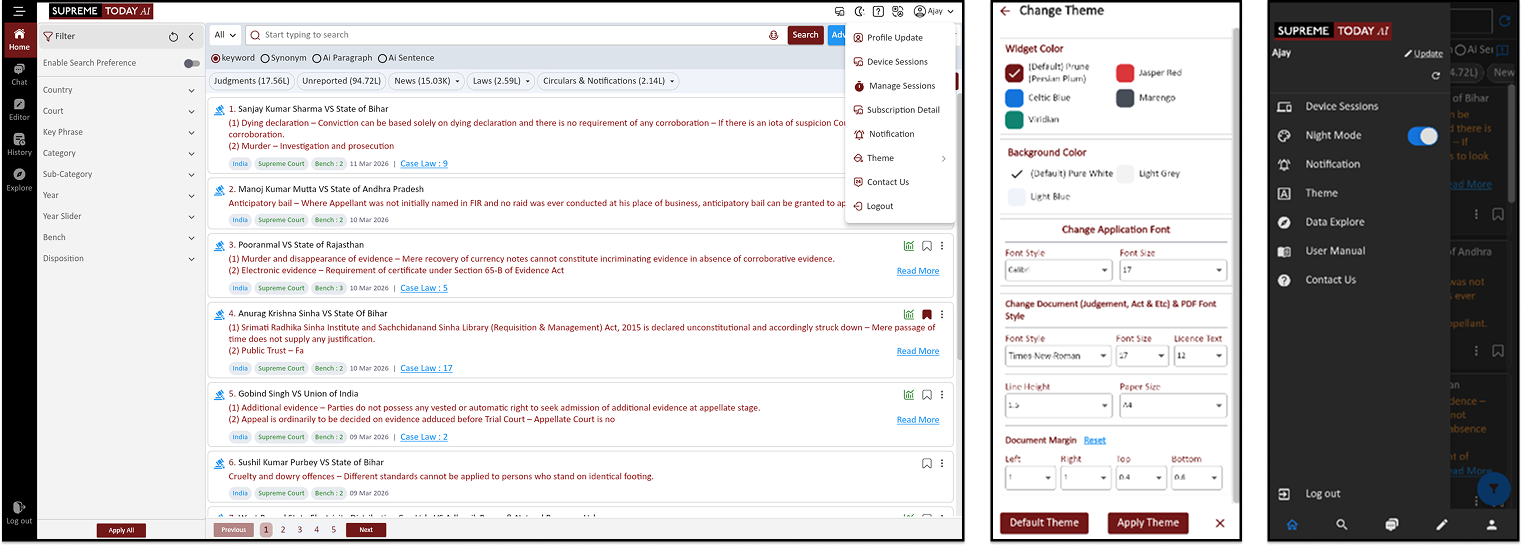
PREFERENCES - SETTINGS & THEME
Quick Options → Fast Shortcut → Dark Mode → User Manual → Translate → Profile Menu → Profile Update → Device Sessions → Manage Sessions → Subscription Detail → Notification → Theme → Contact Us → Logout
Step-by-Step Guide: Quick Settings & Profile Menu
Step 1: Open Quick Options
On the top menu bar you will see four quick options.
1) Fast Shortcut
Quick access buttons to open important tools of the platform directly.
2) Dark Mode
Click the Dark Mode icon to turn Dark Mode ON or OFF.
3) User Manual
Click User Manual to open the software guide and documentation.
4) Translate
Use the Translate option to change the language of the interface.
Step 2: Open Profile Menu
Click the profile icon (user icon) on the top right.
The Profile Menu will open.
Step 3: Profile Menu Options
a. Profile Update
Update your personal details such as name, email, or password.
b. Device Sessions
View the devices where your account is currently logged in.
c. Manage Sessions
Manage or log out from active sessions on other devices.
d. Subscription Detail
View your subscription plan and validity.
e. Notification
Manage alerts and notification settings.
f. Theme
Change the theme of the interface (Light / Dark mode).
g. Contact Us
Open the support page to contact the platform team.
h. Logout
Click Logout to safely sign out of your account.

BOOKMARKS & SEARCH HISTORY
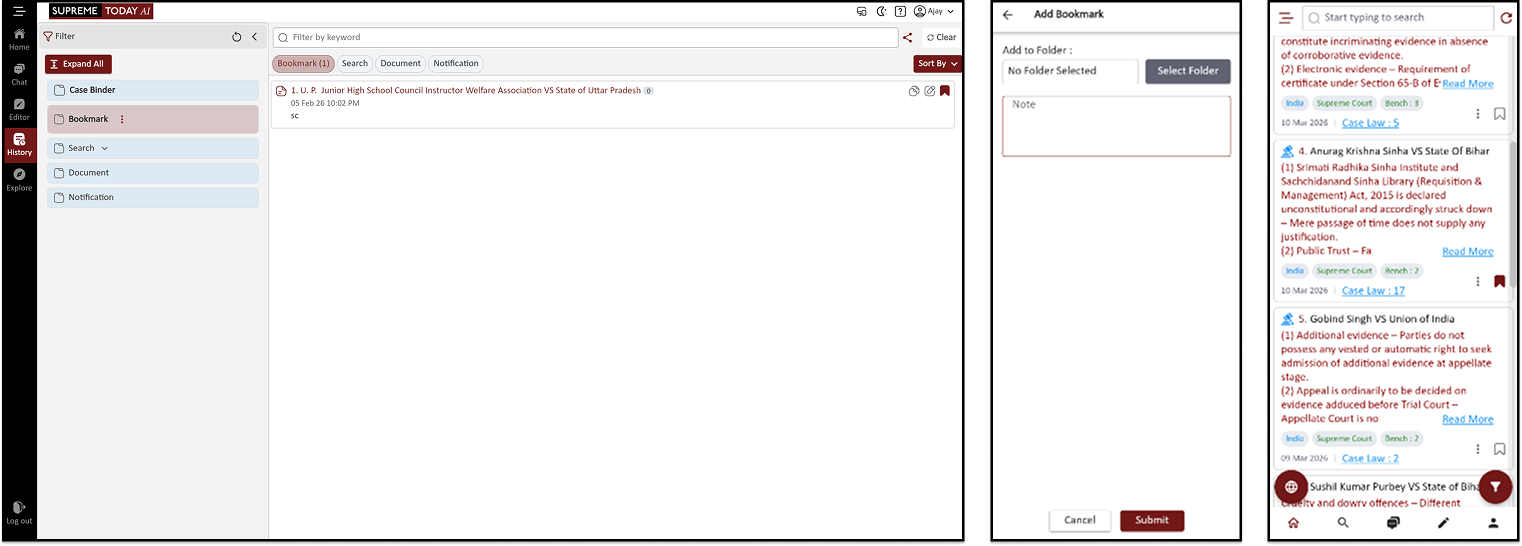
Step-by-Step Guide: Bookmarks & Search History
Step 1: Add Bookmark
Open any judgment or document.
Click Add Bookmark.
Enter the bookmark name.
Click Submit.
The judgment will be saved in your bookmarks.
Step 2: Open History
Go to the History section.
The history panel will open.
Step 3: Open Bookmarks
Click Bookmarks inside the history section.
All saved bookmarks will appear.
Step 4: Manage Bookmarks
Inside bookmarks you can:
Copy the bookmarked content
Edit the bookmark details
Add new bookmarks
Step 5: Check Search History
Go to Search History in the history section.
You will see the list of previous searches.
Step 6: Manage Search History
From search history you can:
Copy the search query
Delete the history item
Share the search result
Change Theme / Settings
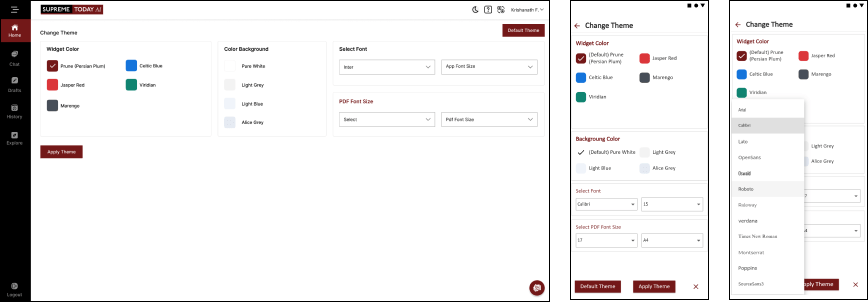
Change Theme:
Personalize your app by adjusting widget color and background color to create a visual experience that suits your preferences.
Font Style:
Customize the fonts throughout the application, including judgments, acts, and other content.
Tailor the text appearance to your liking for an optimal reading experience.
Night Mode:
Enable Night Mode for comfortable reading in low-light conditions. This feature reduces strain on your eyes and enhances your reading experience during nighttime or in dimly lit environments.
PDF Paper Size and Font Size Settings:
Modify the PDF paper size settings and font size to suit your reading and printing preferences.
Adjust these settings to optimize the readability and presentation of documents.
User Search History
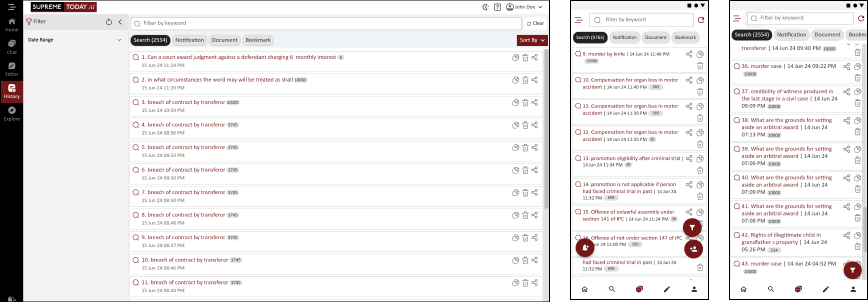
Search History:
Keep track of all your searches with their respective dates, times, and queries. Easily access and reopen previous searches for quick reference and follow-up research, ensuring a seamless and organized research experience.
User Bookmarks History

View Bookmarks:
Utilize the convenient bookmarking feature to flag cases with your personal notes. This functionality makes it effortless to search, find, and reference your saved materials, ensuring easy access to important documents and facilitating streamlined research processes.
Bookmarks & Folders:
Save and organize judgments or legal documents into folders for easy management.
Sticky Notes & Highlights:
Highlight key portions of judgments and add sticky notes for quick reference.
Case Binder:
Compile research into a single document with auto-indexing, custom notes, and a downloadable PDF.
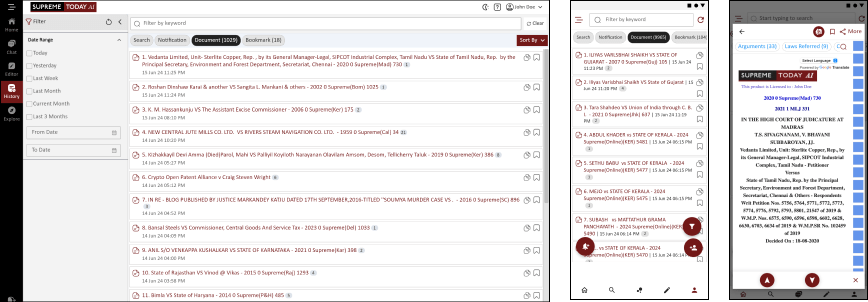
Search Result
1. Introduction
Default Search Result would Show the Latest Updated Ruling
The "Search Result Features" within our legal research tool provide an array of tools to streamline your research and ensure you find the documents that matter most to you. This user manual will guide you through these features, enabling you to navigate search results effectively and with precision.
1.1 Filters for Targeted Results
A. Jurisdiction: Utilize filters to narrow your search results based on specific jurisdictions, ensuring you access documents relevant to your legal focus.
Keywords: Refine your results by using keywords, making it easier to locate documents based on the most relevant terms.
Judge's Name: Search by the name of the presiding judge to pinpoint cases associated with particular jurists.
Acts Referred: Narrow down results by identifying documents that refer to specific acts or legislations.
Clustering and Navigation: Explore clustered results under various categories such as Court, Document Type, Subject, Judge, Ministry, and Period, streamlining navigation for a more user-friendly experience.
1.2 Sorting and Re-Sorting Results
You have the ability to sort and re-sort search results by relevance, latest first, oldest first, most cited, ensuring you view the most pertinent documents first.
1.3 Viewing Documents in New Windows
Open documents in separate windows to facilitate easy browsing, making it convenient to compare and refer to multiple documents simultaneously.
1.4 Search Within Results
The "Search in Results" option allows unlimited nesting, enabling you to narrow down results by searching within your current set of results.
This feature is invaluable for refining your search further.
1.5 Authority Check and Citing Cases
Explore an interactive timeline through Authority Check, identifying later-citing cases.
This feature provides a graphical format to display cases, allowing you to view extracts and citation frequency easily.
1.6 Identifying Overruled Cases
The "Overruled" flag indicates cases where the subject case law has been overruled, helping you stay up to date with the latest legal developments.
This is the content for applying filter and sort on search result.
Supreme Today AI offers a comprehensive and user-friendly approach to help you efficiently filter and sort search results. We understand that navigating through extensive data can be challenging, which is why our platform provides you with powerful tools to simplify the process.
Filter and Categorization:
Our search results are thoughtfully filtered and categorized under various heads to enhance your navigation experience. You'll find that results are organized under the following key categories, allowing you to quickly pinpoint the information most relevant to your research:
Document Type: Filter by Document Type to categorize search results, including Judgments, Unreported cases, News articles, Bare Acts, Amendments, Commentaries, Gazettes, and more.
Court Type: Filter by Court Type to refine your search results by specific court jurisdictions.
Court: Discover results categorized by the court where the cases or documents originated.
Keyword: Access results categorized by relevant keywords and phrases.
Subject: Find results organized by the subject matter, ensuring you can easily locate content related to your field of interest.
Period: Sort results based on the time frame or period within which they were recorded.
Judge Bench: Filter by Judge Bench Wise to easily access cases presided over by specific judges or benches.
Disposition: Filter by Disposition to sort and identify cases by their legal outcomes and dispositions.
Efficient Navigation:
Our intuitive filtering and categorization system simplifies your research process by providing a clear and organized view of the search results. This approach enables you to access the desired information with ease, allowing you to make the most of your time and efforts.
Clustered Results:
Clustered results further enhance navigation by grouping related information together. This means that when you access a category, you'll find a cluster of results that are directly relevant to the specific head you're exploring. This feature streamlines your research, helping you find the exact data you need without the hassle of sifting through unrelated material.
With Supreme Today AI's advanced filtering and categorization system, your research becomes more focused, efficient, and user-friendly. We're dedicated to making your experience as seamless as possible, allowing you to access the precise information you require for your work, studies, or research projects. Discover how these features can empower your search experience and help you achieve your goals effectively.
User Document History
Document History:
Access previously viewed documents based on duration, allowing you to revisit and review materials based on specific timeframes. This feature enables you to manage your research history efficiently and locate previously accessed documents with ease.
User Notification History
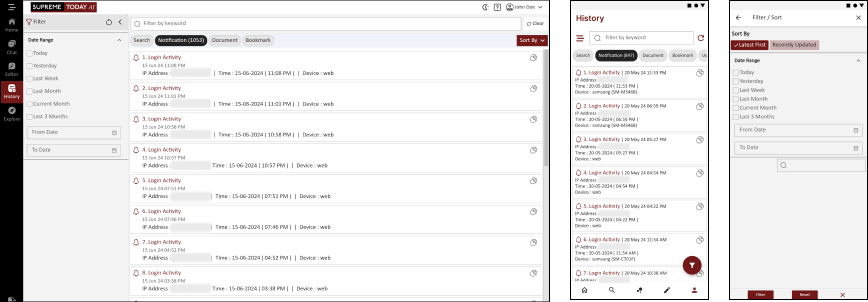
Notification History:
Access previously viewed documents based on duration, allowing you to revisit and review materials based on specific timeframes. This feature enables you to manage your research history efficiently and locate previously accessed documents with ease.

DATA COVERAGE EXPLORER - HOW
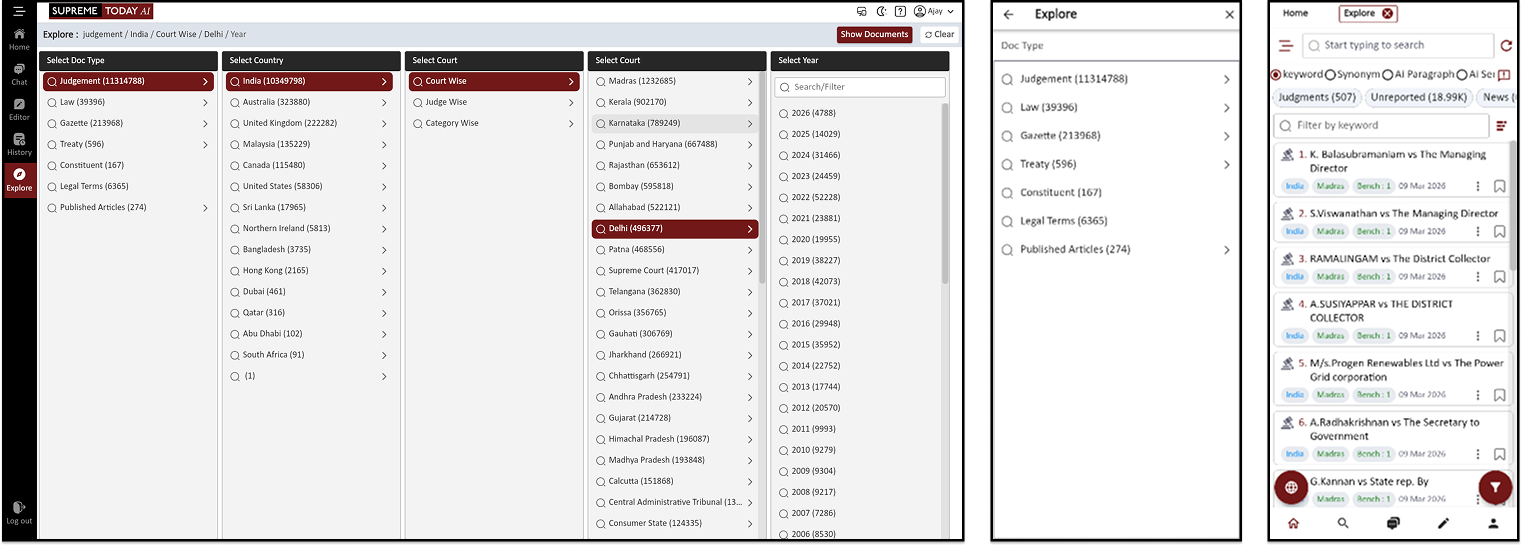
Explore → Select Doc Type (Judgment) → Select Country (India) → Select Court
(Category Wise) → Select Category (Family Law) → Select Sub Category → View
Step-by-Step Guide: Explore and Open Judgment
Step 1: Open Explore
Go to the left menu.
Click Explore.
The Explore search panel will open.
Step 2: Select Document Type
In Select Doc Type, choose Judgment.
This will filter results to show court judgments only.
Step 3: Select Country
In Select Country, choose India.
This will display judgments from Indian courts.
Step 4: Select Court Method
In Select Court, choose Category Wise.
This allows you to search judgments by legal category.
Step 5: Select Category
In Select Category, choose the area of law.
Example: Family Law
Step 6: Select Sub Category
In Select Sub Category, choose the specific legal issue.
Examples:
Maintenance
Divorce
Child Custody
Domestic Violence
Step 7: View Results
After selecting the filters, the judgment results will appear.
The results list will display:
Case title
Court name
Category
Date of judgment
Step 8: Sort Results
Click Sort By.
Choose sorting option if needed (for example relevance or latest).
Step 9: Open Judgment
Click the case title from the results list.
The full judgment page will open.

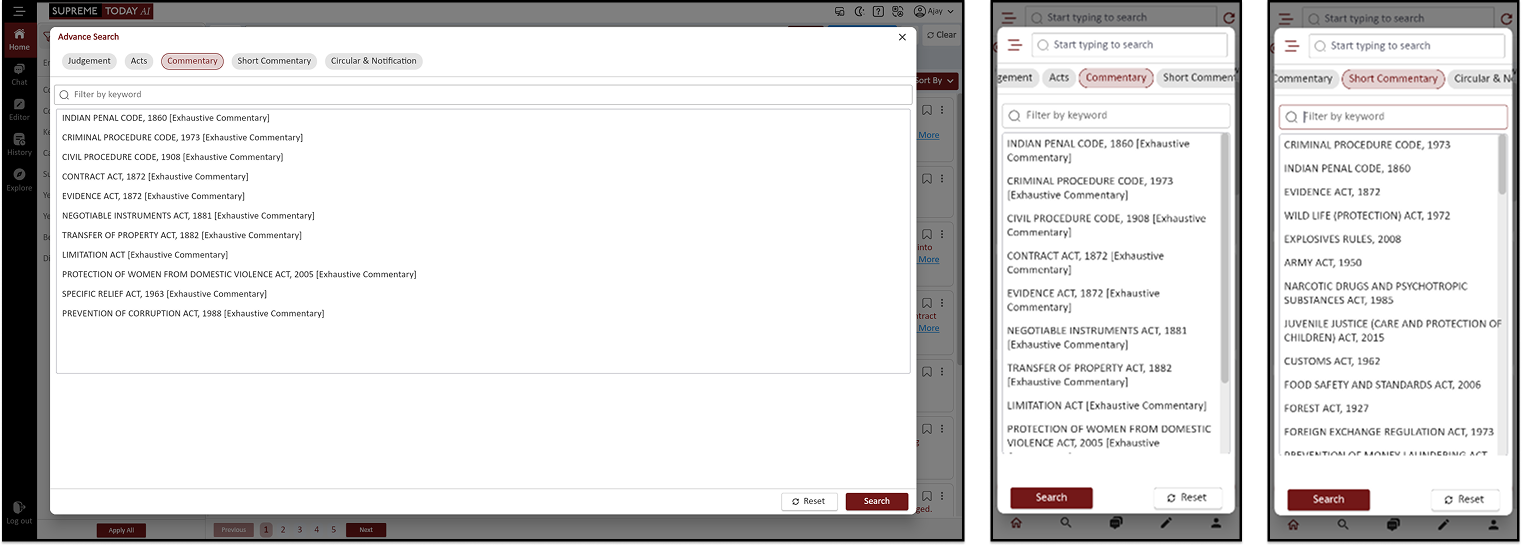
COMMENTARY & SHORT COMMENTARY
Advanced Search → Open Commentary → Search Act (IPC) → Open Act Link → Click Citation → View Judgment
Short Commentary → Search Act (CrPC 1973) → View Results → Open Act Link → Explore Related Acts
Step-by-Step Guide: Commentary Search
Step 1: Open Advanced Search
Go to the Search section.
Click Advanced Search.
Step 2: Open Commentary
In Advanced Search, select Commentary.
The commentary search page will open.
Step 3: Search an Act
In the search box, type the name of the Act.
Example: Indian Penal Code
Click Search.
Step 4: View Results
The system will show results related to the Act.
Each result will contain a link to the Act section.
Step 5: Open the Act
Click the Act link from the results.
The Act content will open.
Step 6: Open Citation Link
Inside the Act page, you will see citation links.
Click the citation link.
The system will open the related judgment.
Step 7: View Judgment
The full judgment page will open.
You can read the case related to that section.
Step-by-Step Guide: Short Commentary Search
Step 1: Search Short Commentary
Open the Search section.
Select Short Commentary.
Step 2: Search an Act
Type the name of the Act.
Example: Criminal Procedure Code 1973
Click Search.
Step 3: View Results
The system will show short commentary results.
Each result contains links to related Acts or sections.
Step 4: Open Related Act
Click any Act link shown in the result.
The related Act or section page will open.
From there you can explore other linked Acts and legal references.

CIRCULAR & NOTIFICATION
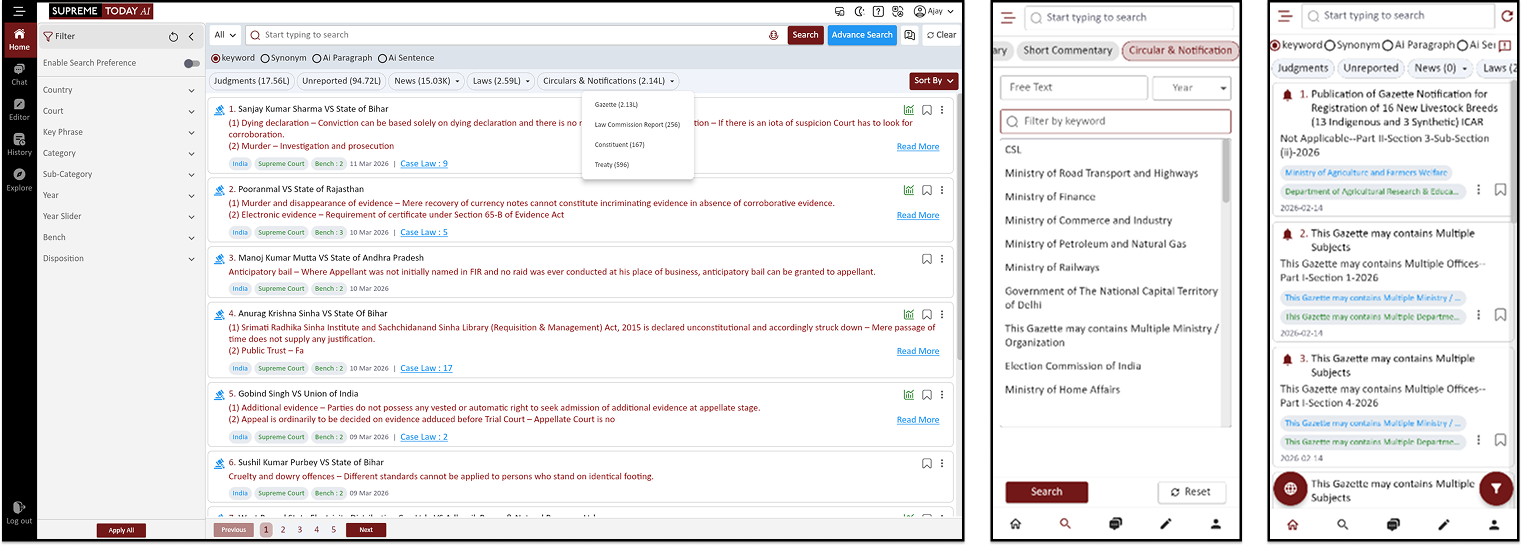
Home → Circulars & Notifications → Gazette / Law Commission / Constituent / Treaty → Advanced Search → Select Circulars & Notifications → Type Ministry Name → Select Year → Search → View Official Copy
Step-by-Step Guide: Circulars & Notifications
Step 1: Open Home Page
Go to the Home page.
Click the Circulars & Notifications tab.
Step 2: View Available Sections
After opening Circulars & Notifications, you will see four options:
Gazette
Law Commission Report
Constituent
Treaty
You can explore these sections to view official documents.
Step 3: Open Advanced Search
Go to the Search section.
Click Advanced Search option.
Step 4: Select Circulars & Notifications
In Advanced Search, select Circulars & Notifications as the document type.
Step 5: Enter Search Query
In the search box, type the ministry name or keyword.
Example: Ministry of Gas
Suggestions will appear.
Click the suggested option.
Step 6: Select Year
Choose the year for the notification.
This helps filter the results.
Step 7: Run Search
Click Search.
The system will show Circulars & Notifications results.
Step 8: View Official Copy
Click the document title.
You can view the official circular or notification copy.

BARE ACT - HOW TO SEARCH
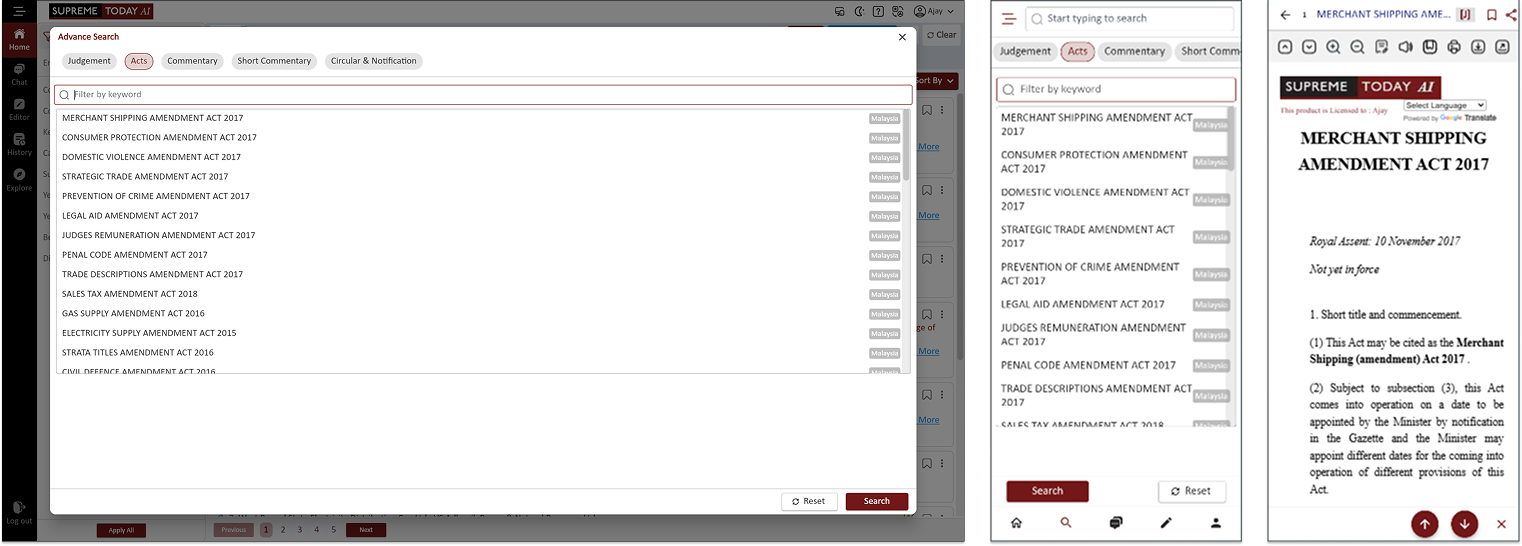
Advanced Search → Select Act → Enter Act Title (BNS) → Search → Scroll Results → Click Section Number → Open Section Page → View Related Sections
Step-by-Step Guide: Search Bare Act
Step 1: Open Advanced Search
Go to the Search section.
Click Advanced Search.
Step 2: Select Act
In the document type options, click Act.
The Act search panel will open.
Step 3: Enter Act Title
In the Act Title field, type the name of the Act.
Example: BNS (Bharatiya Nyaya Sanhita)
Click Search.
Step 4: View Results
The system will show the Bare Act content.
You can scroll through the Act sections.
Step 5: Jump to Section
Section numbers will be displayed in the Act.
Click the section number to jump directly to that part of the Act.
Step 6: Open Section Title Link
Next to the section title, there will be a number link.
Click the link to open that section separately.
Step 7: View Related Sections
Inside the section page, you will see related section links.
Click any link to navigate directly to another section of the Act.

JUDICIAL ANALYSIS – UNDERSTANDING CASE INFLUENCE & LEGAL STRENGTH
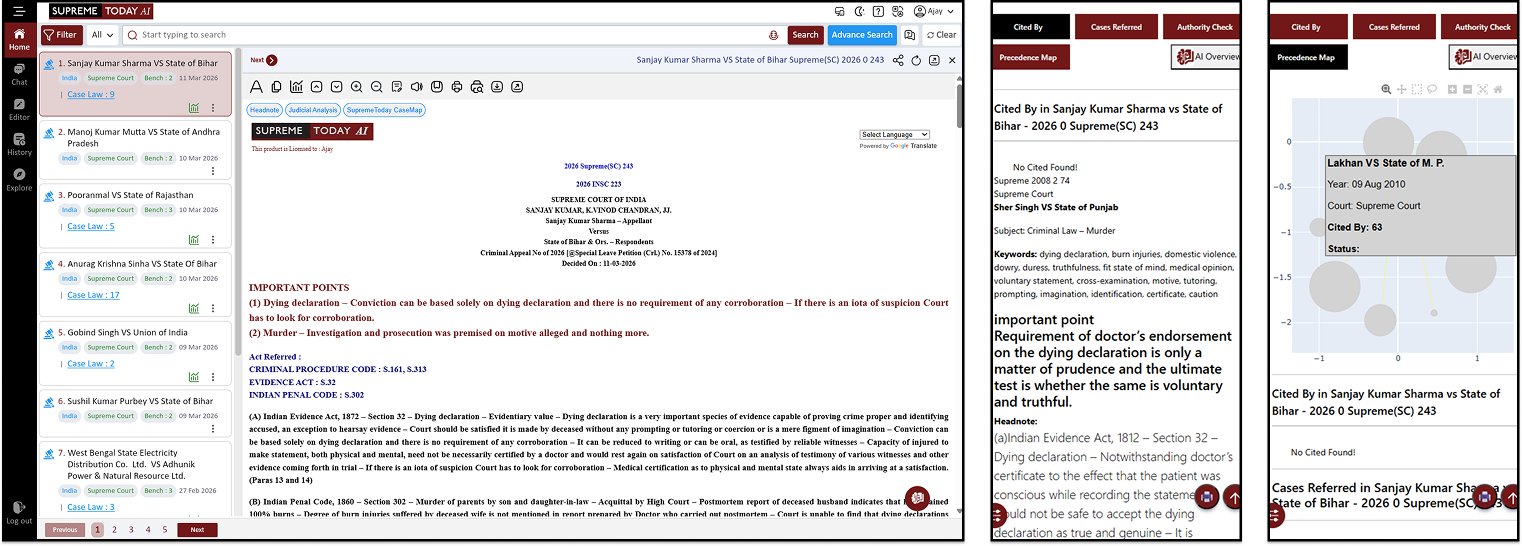
Select Example → Find Judgment → Sort by Most Cited → Open Judgment → Judgment Analytics → Authority Check → Precedence Map → AI Overview → Open Related Judgments
Step-by-Step Guide: Judicial Analysis
Step 1: Select Example
Open the Search or Chat section.
Click Example.
Select any example query.
Step 2: Find Judgment
The system will show judgment results related to the example.
Sort the results by Most Cited.
Step 3: Open Judgment
Click any judgment from the result list.
The judgment page will open.
Step 4: Open Judgment Analytics
On the judgment page, open Judgment Analytics.
This section shows the legal analysis of the case.
Step 5: View Most Cited
Inside Judgment Analytics, check Most Cited cases.
These are the frequently cited judgments.
Step 6: Authority Check
Click Authority Check.
Here you will see Most Cited references related to the judgment.
Step 7: View Precedence Map
Click Precedence Map.
This shows the relationship between different judgments.
Step 8: AI Overview
Open AI Overview.
AI will generate a summary of the judgment.
Step 9: Open Related Judgment Links
In AI Overview, two judgment links will appear.
Click the links to open and read the related judgments.

JUDGMENT VIEW - WITH AI ASSISTANCE
Search Judgment → Open Judgment → Use Tools (Text View / Notes / Analytics) → Open Court PDF → Use Headnotes → Jump to Paragraph → Open in New Page → Chat with AI Assistant → Translate / Print → View Mind Map
Step-by-Step Guide: Judgment View & Tools
Step 1: Find the Judgment
Open the Search section.
Enter your keyword or query.
From the results list, open the judgment.
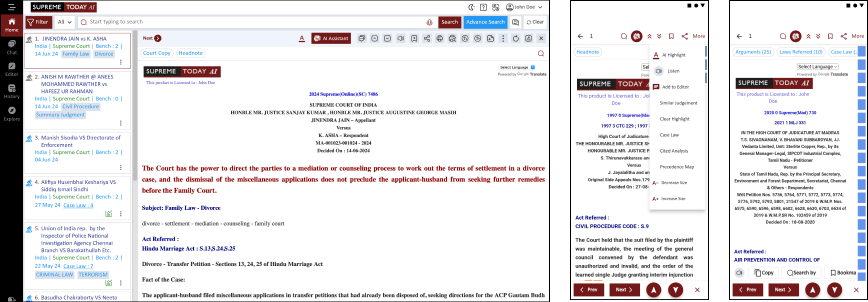
Step 2: View Judgment Tools
After opening the judgment, several tools are available:
Text View – Switch to text reading mode.
Notes / Annotation – Add notes or comments to the document.
Analytics / Insights – View charts and insights about the judgment.
Scroll Up – Move upward in the document.
Scroll Down – Move downward in the document.
Zoom Out – Decrease text size.
Comments Panel – View or add comments.
Read Aloud – Listen to the judgment as audio.
Bookmark – Save the judgment for later.
Print – Print the document.
Download – Download the judgment file.
Full Screen – Open the judgment in full-screen mode.
Step 3: Open Court PDF
Click Court Copy.
The official court PDF of the judgment will open.
Step 4: Use Headnotes
In Headnotes, you can click any topic.
The system will jump directly to that part of the judgment.
Step 5: Navigate by Paragraph
Paragraph numbers are displayed beside the text.
Enter a number (for example 1, 2, 3, 4) to jump directly to that paragraph.
Step 6: Open Judgment in New Page
You can open the judgment in another page or tab.
This allows easier reading and comparison.
Step 7: Use AI Assistant
Open AI Assistant.
You can chat directly with AI about the judgment.
Ask questions related to the case or legal issues.
Step 8: Translate the Judgment
Click Translate.
Choose the language.
The judgment will be translated into the selected language.
Step 9: Print Settings
Click Print.
You can change print settings.
Select which parts of the judgment you want in the PDF.
Step 10: View Mind Map
Click Mind Map.
This shows a visual map of the case structure.
It helps you understand the complete judgment easily.
Cited By
Case Law
1. Introduction
Default Search Result would Show the Latest Updated Ruling
The Cited Paragraphs feature in our legal research tool is a powerful resource that enhances your ability to explore the relevant sections within various judgments where the current case has been referred. This user manual will guide you through the functionality of this feature, enabling you to delve deep into the interconnected web of legal references.
1.1 Accessing the Cited Paragraphs Feature
The Cited in Para link appears at the top of a judgment, typically where the current case, for example, "Supreme Court Advocates-on-Record Association vs Union of India" has been referenced in other judgments. To access this feature, follow these simple steps:
1.2 Navigating Cited Paragraphs
Open the judgment you are interested in, such as "Supreme Court Advocates-on-Record Association vs Union of India"
Look for the "Cited in" link at the top of the judgment. This link will only appear in judgments that have been referenced in other judgments.
Click on the "Cited in" link to proceed.
1.3 Filter and Sort Functionality
One of the key strengths of this feature is its ability to filter and sort cited results according to various criteria. You can narrow down your search and make it more specific using these functionalities.
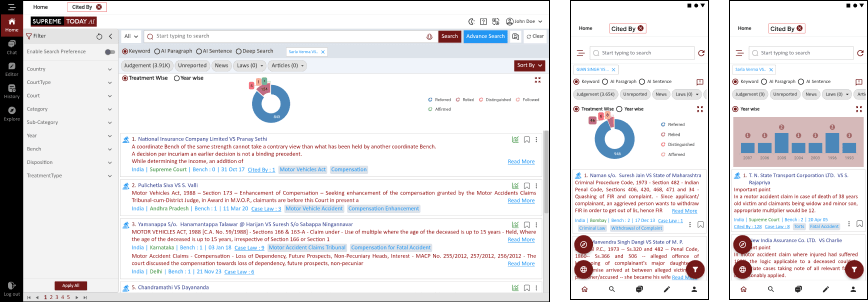
1.3 Treatment-Based Cited Analysis
This visualization allows you to understand how a specific case has been cited by examining its treatment. By exploring whether a case has been cited positively, negatively, or neutrally, you can assess its legal significance and implications more comprehensively. This section of the user manual will guide you through the process of conducting treatment-based cited analysis
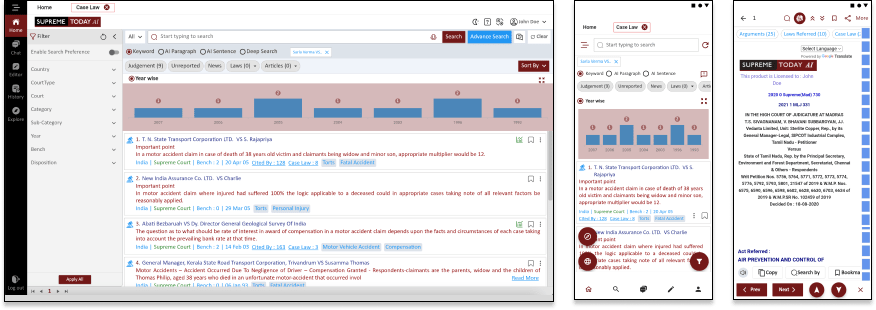
1.4 Year-Wise Cited Analysis
With year-wise citation analysis, you can observe how a case has been cited over time. This feature provides insights into the case's historical relevance and impact on legal jurisprudence. The user manual will explain how to access and interpret this visualization, enabling you to gain valuable insights into the long-term influence of cited paragraphs.
These visualization tools are designed to enhance your legal research experience by providing a dynamic and interactive way to understand how legal cases and paragraphs have been cited, treated, and evolved over time.
1.5 Benefits of Using Cited Paragraphs
The Cited Paragraphs feature offers several benefits to legal professionals and researchers:
Efficient Cross-Referencing: Quickly locate and navigate to the specific paragraphs within other judgments where the current case has been cited, facilitating cross-referencing and comprehensive research.
In-Depth Analysis: Gain a deeper understanding of the legal landscape by exploring how your case is cited and referred to in the context of other legal decisions.
Time-Saving: Save time and effort in your research by directly accessing relevant sections of other judgments, eliminating the need to manually search for citations.
Enhanced Context: Get a broader perspective on how your case fits into the legal framework and its implications in other legal contexts.
The Cited Paragraphs feature is a valuable tool that empowers legal professionals to explore the broader legal narrative, making it an essential component of our legal research tool. Use this user manual as your guide to fully harness the potential of the Cited Paragraphs feature and elevate your legal research experience.
Judgement Detail View
1. Introduction
The Judgment Detail View feature of our legal research tool offers comprehensive options for accessing, managing, and understanding legal judgments.
2. Judgment View
2.1 Detailed Structuring
Explore the Judgment View feature that offers an intricately structured analysis of legal cases, including:
Thorough dissection of the Fact of the Case.
In-depth elucidation of Arguments by all parties.
Comprehensive cataloging of relevant Case Law.
Insightful Case Analysis to decode judicial interpretations.
Immediate summary through the Final Conclusion.
2.1 Additional Information
Access critical additional information, including case citations, treatment in future cases, recent citations, significant paragraphs, case notes, subject, and disposition. This feature provides lawyers with a comprehensive understanding of the case.
3. Printing, Emailing & Saving Judgments
A. Printing: You can print judgments by clicking on the print icon. Choose between printing with or without case notes and preview the document before printing.
B. Emailing: Email the displayed document by selecting the "Email this page" option. Customize the recipient's email address and send the document. Alternatively, you can email from the session list.
C. Saving: Save judgments by clicking the "Save" icon at the top right corner of the document. Organize your saved documents into folders, create new folders, and apply optional password protection for added security.
4. Similar Judgments, Future Cited References
Leverage the power of AI to locate legal decisions that share common themes and elements, making it easier to find relevant cases for your research.
Explore how a case has been cited in subsequent legal decisions, providing valuable insights into its ongoing impact and relevance.
5. Important Paragraphs in Judgments
View or jump directly to key paragraphs within judgments, with details on their references in Supreme Court judgments and the treatment they have received. The application highlights the most relevant paragraphs based on your search query, streamlining your research process.
6. Search from Judgment when Reading
While reading judgments, you may come across words or phrases highlighted in blue. Hover over them to reveal their legal meanings. Explore additional features such as "Search this word" and "Search this Paragraph" to gain a deeper understanding and conduct targeted searches.
7. Navigation via Hyperlink or Buttons
navigating within the document, and returning to results now appear at the bottom right of the page upon mouse rollover, eliminating the need for manual scrolling.
8. Google Translate
Enhance your experience by translating content into regional languages using Google Translate, ensuring accessibility and comprehension for a broader audience.

ASK A QUESTION
Open Chat → Ask a Question → Select Search Mode → Run Example Query → Continue Chat (Deep Search) → View Recent Judgments → Open Arguments & Judgment Links → Save Content to Editor → Start New Chat → Filter by Court → Get Judgment Results
Step-by-Step Guide: Ask a Question (Chat)
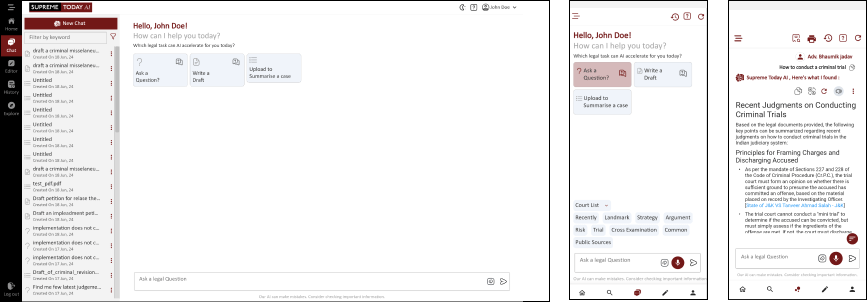
Step 1: Open Chat
Open the Chat section.
Click Ask a Question.
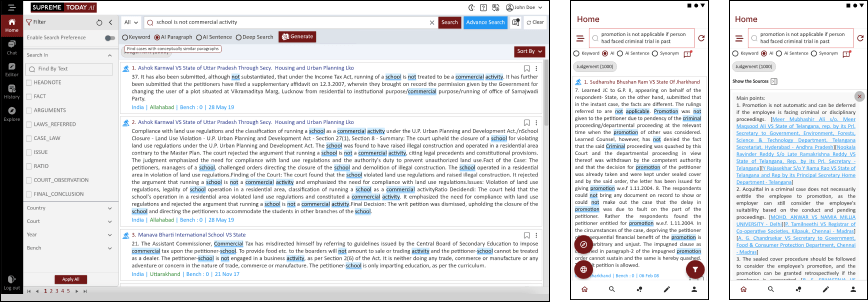
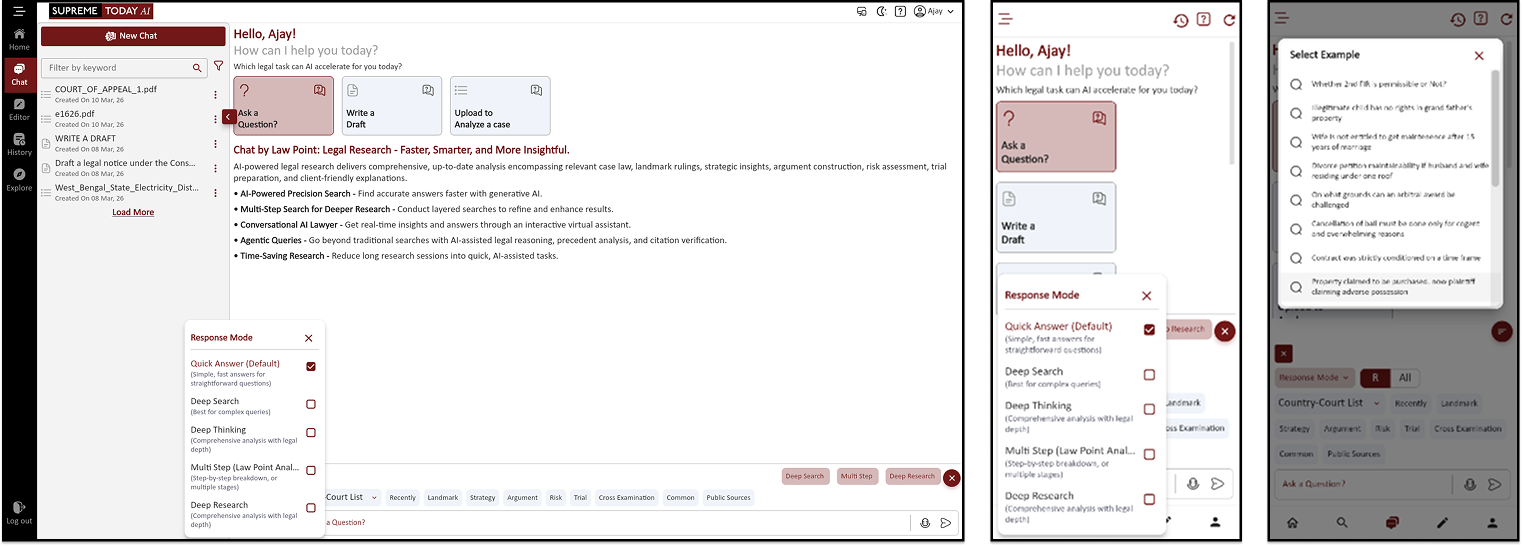
Step 2: Select Search Mode
Choose the Search Mode from the dropdown.
Available modes include:
Quick Answer (Default)
Deep Search
Deep Thinking
Multi Step (Law Point Analysis)
Deep Research
These modes help the AI provide answers with different levels of analysis.
Step 3: Use an Example Query
Click Example.
Select any example query.
The system will process the query and generate the result in the chat.
Step 4: Continue Chat with Deep Search
Click Continue Chat.
Change the search mode to Deep Search.
The AI will provide more detailed results and legal references.
Step 5: View Recent Judgements
Select the Recently option.
The system will display recent judgments related to the topic.
Step 6: View Arguments
Click Argument.
The AI will show the legal arguments related to the selected case.
Step 7: Open Judgment Link
Inside the chat result, you will see judgment links.
Click the link to open and read the full judgment.
Step 8: Save to Editor
If you find useful content in the chat result, you can save it to the Editor.
Click Save to Editor.
The content will be available in the Editor for further editing or formatting.
Step 9: Start a New Chat
Open a New Chat.
Select your Search Mode again.
Step 10: Use Court Filter
In the search options, you will see a Court filter.
Two options are available:
Reviewed Judgments
All Judgments
Select All Judgments.
Step 11: Select Court
Choose the court you want.
Example:
Supreme Court
High Court
Other courts
This ensures the results show judgments only from the selected court.
Step 12: Use Example Query Again
Select an example query or type your own query.
The AI will generate the legal answer with relevant judgments.

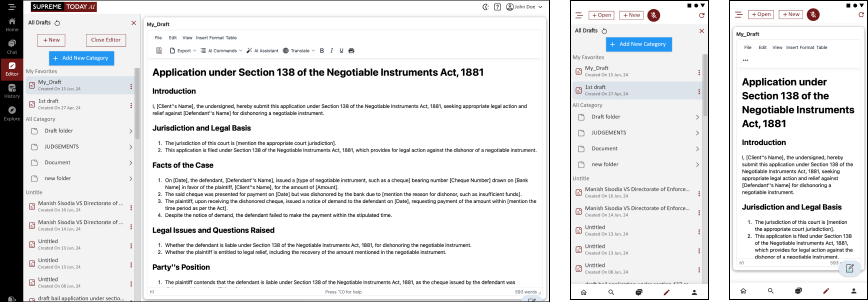
WRITE A DRAFT | STEP-BY-STEP GUIDE
Chat → Upload to Case → OCR → Result → Translate
Editor → Upload File → Edit → Translate
Chat → Write a Draft → Include Case Law / My Collection / Your Performa /Providing Essential Information
Step 1: Chat – Upload to Case (OCR Analysis)
Open the Chat section.
Click Upload to Case.
Click Upload File and select the PDF document.
Choose OCR option.
Click Send.
The AI will process the file and generate the result in the chat.
After the result appears, you can translate the output into another language.
Step 2: Editor – Upload and Edit File
Open the Editor section.
Click Upload File.
Select the document or PDF file.
The file will open inside the editor.
You can edit and format the content in the editor.
The editor also allows you to translate the text directly.
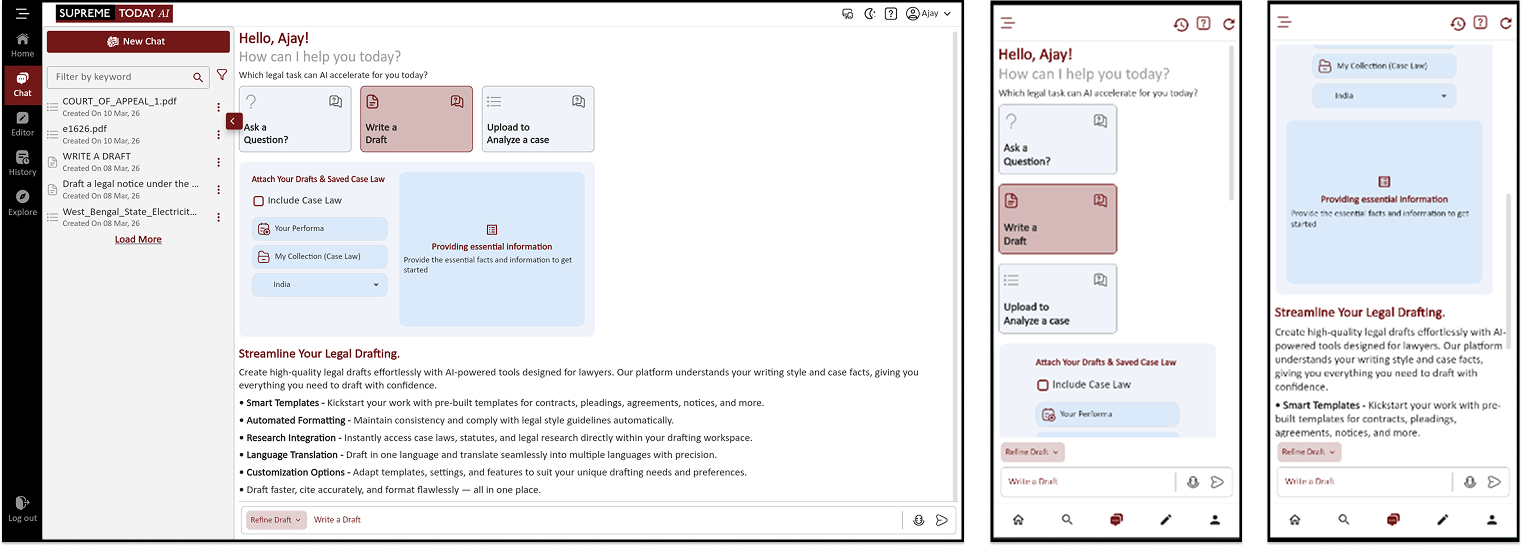
Step 3: Chat – Write a Draft
Open the Chat again.
Click Write a Draft.
You will see five options:
Include Case Law
Your Performa
My Collection (Case Law)
India
Providing Essential Information
Step 4: Include Case Law
Click Include Case Law.
Type the legal issue or case topic you want.
The AI will search and show relevant case laws.
The system will generate a draft using those case laws.
Step 5: My Collection (Case Law)
Click My Collection (Case Law).
Here you will see cases you previously bookmarked or saved.
Select the required case.
You can generate a draft or chat based on that case.
Step 6: Your Performa
Click Your Performa.
Select a pre-saved example or format.
The AI will generate the draft in the selected legal format.
Example formats may include:
Petition
Application
Written Submission
Legal Notice
Step 7: Providing Essential Information
Click Providing Essential Information.
The system will ask a series of questions.
Provide answers to those questions.
Select the court type if required.
Based on the information provided, the AI will generate a complete legal draft.

UPLOAD TO ANALYSIS | FULL TUTORIAL
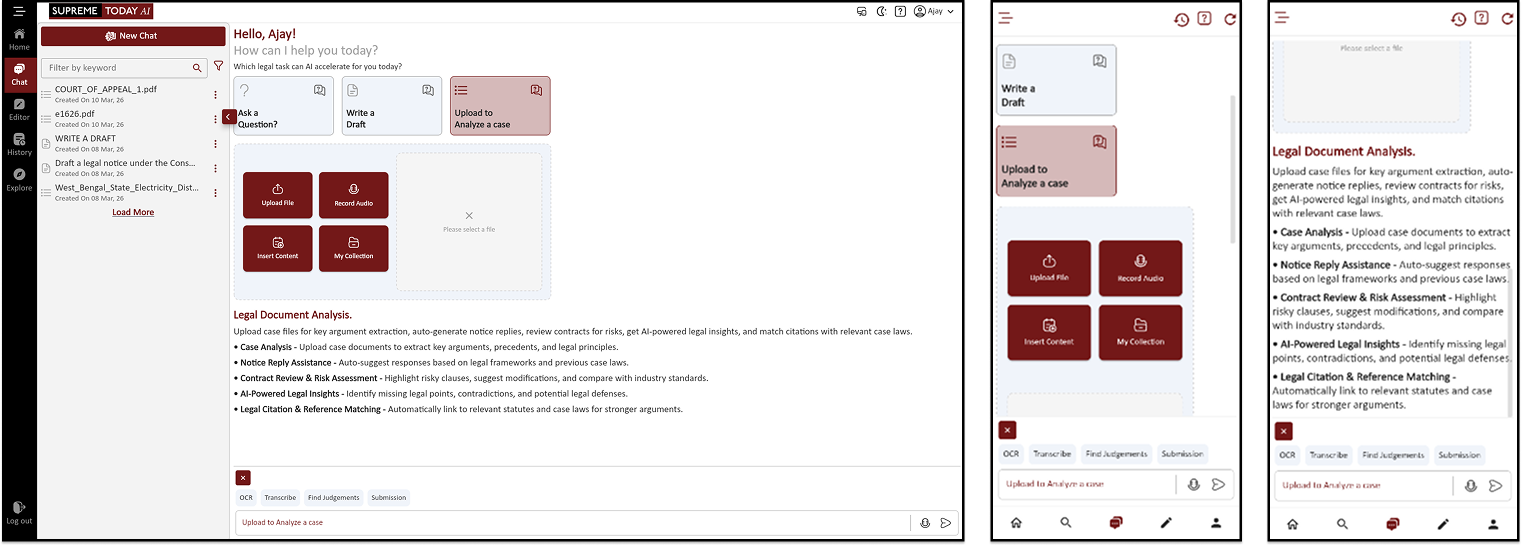
Open Chat → Upload File → Use Feature (OCR / Transcribe / Find Judgements / Submission) → Get Output → Translate Output
1. Open the Chat
a. Go to Upload to Analysis section in Supreme Today AI.
b. A chat interface will open where you can interact with AI.
c. This chat allows you to upload and analyze legal documents.
2. Upload the PDF File
a. Click Upload File in the chat window.
b. Select the PDF document from your computer.
c. The PDF will appear inside the chat and will be ready for analysis.
3. Choose the Required Action (Based on Your Query)
a. OCR (Optical Character Recognition) Converts scanned PDF judgments or image-based PDFs into editable text so the document can be read and analyzed by AI.
b. Find Judgements Searches and provides relevant court judgments and case laws related to the content of the uploaded PDF.
c. Submission Generates a structured legal submission or draft argument based on the information extracted from the PDF document.
4. Review the Output
a. The AI will generate the analysis or result in the chat.
b. You can read and review the generated legal content.
c. Edit or copy the output if required.
5. Translate the Output
a. Click the Translate option.
b. Choose the required language (for example Hindi, Gujarati, etc.).
c. The generated output will be translated into the selected language.

WRITE USING THE EDITOR
Upload Judgment → AI Case Analysis → View Key Points → Add to Editor → Format the Document → Export Final Draft
How to Write Using the Editor (Step-by-Step Guide)
Step 1: Find the Judgment
First go to the Search section.
Search for the judgment or case you need.
Use keywords, case name, or citation to find it.
Open the required judgment page.
Step 2: Add the Judgment to Editor
On the judgment page, select the text or part of the judgment you want to use.
Click the Add to Editor option.
The selected content will be sent to the Editor workspace.
Step 3: Open the Editor
Go to the Editor section from the menu.
Find the file you just added.
Click the document to open it inside the editor.
Step 4: Format and Edit the Content
Now edit the text inside the editor.
Format the document properly:
Add headings
Adjust paragraphs
Highlight important points
Remove unnecessary text
Use AI tools if needed to improve or summarize the content.
Step 5: Final Review
Read the document once again.
Check formatting, spelling, and structure.
Make sure the content is clear and properly organized.
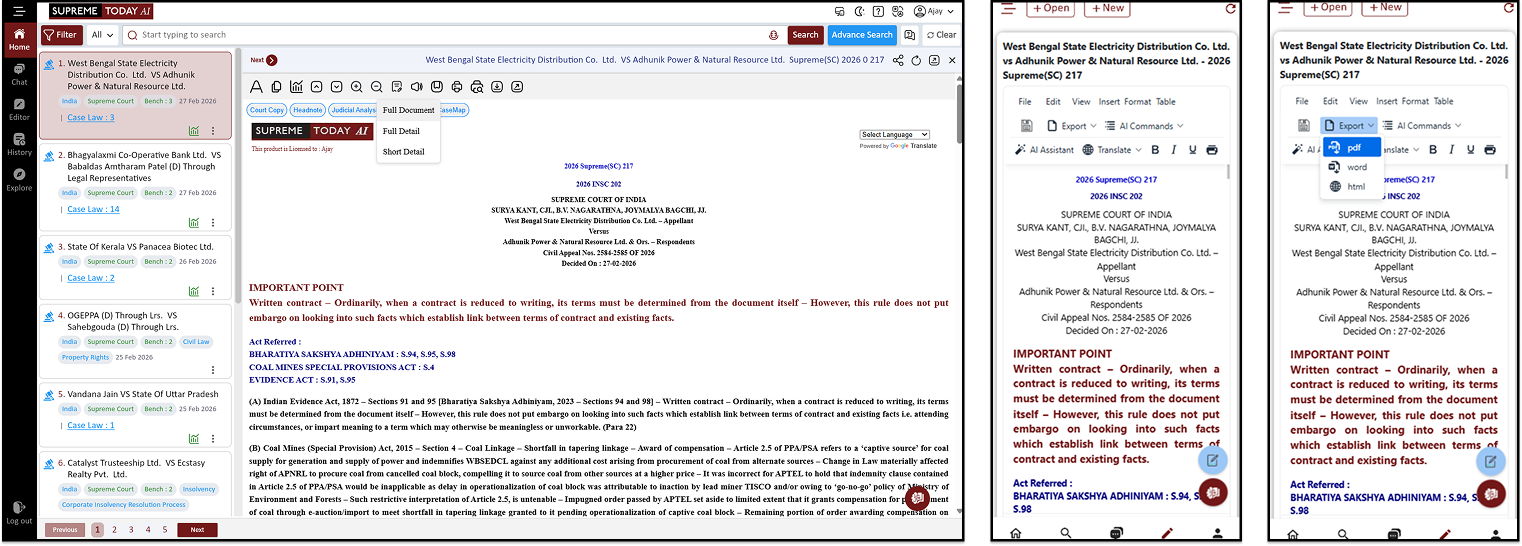
Step 6: Export the Document
After finishing the document, click Export.
Choose the required format such as:
Word (DOCX)
Text
Download the final document to your system.
Chat by Law Point: Legal Research - Faster, Smarter, and More Insightful.
AI-powered legal research delivers comprehensive, up-to-date analysis encompassing relevant case law, landmark rulings, strategic insights, argument construction, risk assessment, trial preparation, and client-friendly explanations.
AI-Powered Precision Search - Find accurate answers faster with generative AI.
Multi-Step Search for Deeper Research - Conduct layered searches to refine and enhance results.
Conversational AI Lawyer - Get real-time insights and answers through an interactive virtual
assistant.Agentic Queries - Go beyond traditional searches with AI-assisted legal reasoning, precedent analysis, and citation verification.
Time-Saving Research - Reduce long research sessions into quick, AI-assisted tasks.
E.g.:
- illegitimate child has no rights in grandfather's property
- How do medical professionals determine whether multiple minor hurts should be considered as murder or lesser offence
- Can an unregistered agreement for the sale of property be considered legally valid and enforceable
- can a ex director of company claim for a amount of cheque with is in the name of dissolved company
Chat : Streamline Your Legal Drafting
AI-Powered Drafting : Effortlessly Create Customised Legal Documents by Understanding Your Writing Style and Case Facts.
Smart Templates - Jumpstart your drafting with pre-built templates for various legal documents, including contracts, agreements, letters, and more.
Automated Formatting - Ensure consistency and adherence to legal style guidelines with automatic formatting features.
Research Integration - Seamlessly access relevant legal research, case law, and statutes within the drafting environment.
Language Translation - Translate legal documents into multiple languages with accuracy and efficiency.
Customization Options - Tailor the software to your specific needs and preferences with customizable settings and features.
E.g.:
- Draft a legal notice under the Payment of Gratuity Act, 1972, for an employee claiming gratuity benefits from their employer.
- Write a legal draft on the application of the Indian Contract Act, 1872, in a breach of contract dispute between two parties.
- Write a anticipatory bail application on medical grounds under section 438 of CrPC
Chat : Legal Document Analysis
Upload case files for key argument extraction, auto-generate notice replies, review contracts for risks, get AI-powered legal insights, and match citations with relevant case laws.
Case Analysis - Upload case documents to extract key arguments, precedents, and legal principles.
Notice Reply Assistance - Auto-suggest responses based on legal frameworks and previous case laws.
Contract Review & Risk Assessment - Highlight risky clauses, suggest modifications, and compare with industry standards.
AI-Powered Legal Insights - Identify missing legal points, contradictions, and potential legal defenses. efficiency.
Legal Citation & Reference Matching - Automatically link to relevant statutes and case laws for stronger arguments.
E.g.:
- List all indemnity and liability clauses from this contract.
- Summarize the key legal arguments in this document.
- Extract all legal arguments made by the petitioner/respondent.
- List all direct statements that support [specific argument].
- Identify any uncertain or vague statements in this testimony.
- Create a summary of this deposition including key questions and answers.
Editor: AI Writing and Review Assistant | Template Form
Ensure clarity, consistency, legal accuracy, grammatical correctness, and a professional tone in the document.
Auto-Generate Draft Templates - Automatically create a structured legal template from a given draft, allowing dynamic form filling with relevant legal fields.
Clarity & Precision - Ensure the language is clear, concise, and free of ambiguity while maintaining legal accuracy.
Consistency & Formatting - Check for consistency in legal terminology, citations, headings, and document structure.
Grammar & Syntax - Review for grammatical errors, punctuation, and sentence structure to enhance readability.
Legal Soundness - Verify the accuracy of legal references, case laws, and statutory provisions cited in the text.
Professional Tone & Style - Maintain a formal and persuasive tone appropriate for legal writing, ensuring compliance with jurisdictional standards.

An indispensable Tool for Legal Professionals, Endorsed by Various High Court and Judicial Officers
Please visit our Training & Support
Center or Contact Us for assistance

Scan Me!
India’s Legal research and Law Firm App, Download now!

For Daily Legal Updates, Join us on :
